


Photo by Joshua Aragon on Unsplash
A Step-By-Step Guide To Create A Full Stack Web Application Using ‘Deno Fresh’ Framework


What is Deno ?
Deno is a modern and secure JavaScript, TypeScript, and WebAssembly runtime written in Rust that uses V8 engine underthehood.
It is was originally created by Ryan Dahl yes you heard it correctly the same person who has created Node js. Later Deno Land Inc and contributors continued this project for production ready systems.
Deno is very secure as resources like files, network and environment cannot be accessed if you do not explicitly enable that.
Deno has out of the box support for typescript which makes it more powerful. It also has built in tools for inspecting dependencies (deno info), code formatting (deno fmt).
The most appealing thing is that it ships with a single executable with no dependencies.
Deno is also powerful in the sense that it can import modules from any location on the web, whether it may be your personal web server, CDN or GitHub, which makes it much easier to consume third-party modules.
Deno built in tool chain allows developers to be more productive as it saves time that was wasted in searching third party modules.
Deno is going to build a platform that is what a startup or a company needs, a complete package from development to deplyoment and Deno is trying to do that, which is amazing. As per my observation, Deno is working on improving Typescript and Javascript by using Rust as their core technology.
What is Fresh ?
Fresh is a new full stack Javascript framework built for Deno. You will say, another day another Javascript framework, but this one is special as it is very much different from other full stack frameworks available. First of all, it is for Deno by default and may be after certain customization, it can get it to Node js. Fresh is typescript by default.
The documentation Fresh says that they do not ship any kind of Javascript by default because client side Javascript is very expensive as it slows down the UX, which means Fresh uses a lot of Server Side Rendering and ships 0KB of Javascript to the client by default.
Fresh uses a model known as Islands Architecture, by Jason Miller, which states that no Javscript should be shipped to the client side unless the developer explicitly opts in to do that for any specific component.
Fresh is basically a routing framework with a built-in templating engine, which means pages are only rendered as and when they are requested on a server. For rendering and templating, Fresh uses Preact (a low footprint -3KB React alternative) and TSX on both client and server side.
One more thing which makes Fresh special and different from other full stack frameworks is that fresh does not have any build system, which means the code that we write is directly executed on both server and client side and translation from Typescript to Javascript is done just-in-time when it is needed. Thus, deployment of Fresh application is always instantaneous, which makes it much faster.
Creating your first Fresh app
Before creating a new Fresh application, you need to have Deno installed in your system. Deno can be installed in various ways as described in its install guide. We will be using the following command to install Deno in our system.
curl -fsSL https://deno.land/install.sh | sh
After we have complted installing Deno we will scaffold a new Fresh application by the following code.
deno run -A -r https://fresh.deno.dev my-app
The above script generates a minimal boilerplate Fresh project in your current folder. The figure below shows the directory structure of the minimal Fresh application just generated.
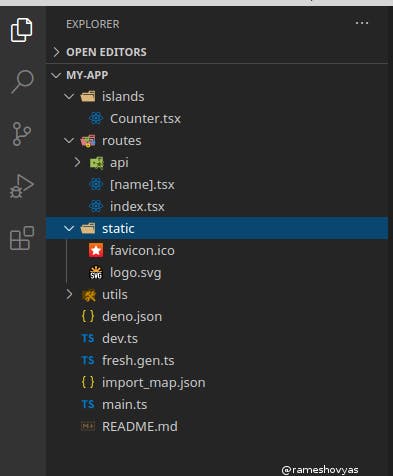
From the above folder structure that, four files are necessary to run your Fresh application.
dev.ts : Entry point of your project in development mode. File name could be any but it is convention to keep it as dev.ts.
main.ts : Entry point of your project in production mode. This file is linked when we deploy our project to Deno Deploy, again you can choose any name not necessarily main.ts it is just a convention.
fresh.gen.ts : This is your project's manifest file containing information about various routes and islands of our Fresh project.
import_map.json : Project's import map file used to manage dependencies of project.
One more file deno.json is generated during this scaffolding process. This file tells Deno about the location of import map so that it becomes easy for Deno to manage dependencies. Also, a "start" task is registered to run our project, otherwise that could have been done by using deno run command.
Few important folders also get created and they are as follows:
routes: All of the routes of our application resides in this folder. The file name corresponds to the path of the page that has to be accessed.
islands : All interactive islands of our projects reside in this folder and the name of each file correcsponds to respective island of our project.
static : Contains all static files that are delivered as it is.
Running our application
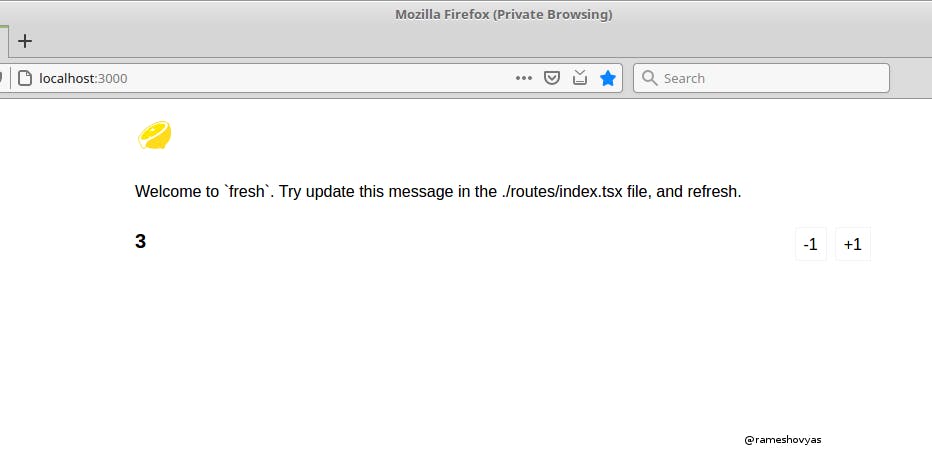
Now its time to run our project on our local machine, for this we will have to issue the folowing command in our Fresh project's folder :
deno task start
By default application port is 8000 we can also change this in main.ts as below :
await start(manifest, { render, port:3000 });
Now your application will be listening at port 3000 instead default 8000.
Creating new Route
Routes are used to encapsulate the logic behind handling various requests to a particular path in our project. It could be an API request or a request to render simple HTML page. In this article we will be using routes to render simple HTML page.
As we have previously seen, that for each path in our project we need to create a file of same name in our routes folder or directory. For example, if we need a path for /about we will have to create a file about.js in our routes directory.
This system is known as File System Routing.
In our Fresh project route files renders HTML, JavaScript or TypeScript in the form of JSX or TSX components.
For now we are going to create a route to handle /about page for this we need to create a new file routes/about.tsx.
After creating new route our project's folder structure looks like this:
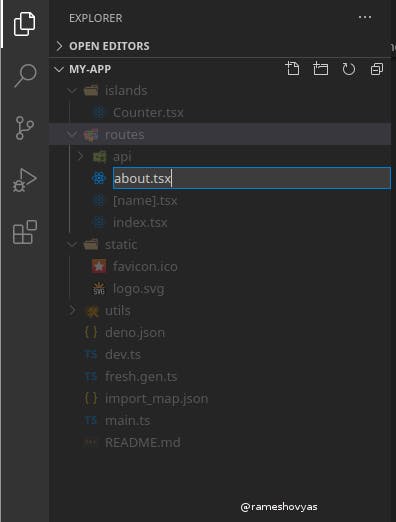
After creating route for */about we have left with declaring a component using JSX that will be rendered everytime a user requests for /about*.
Place the following code in about.tsx file that we have created recently.
// routes/about.tsx

/** @jsx h */
import { h } from "preact";

export default function AboutPage() {
  return (
    <main>
      <h2>About</h2>
      <p>Hello, you are in our about us page.</p>
    </main>
  );
}
Do not get confused with the first two lines they are just boiler-plated JSX pragma code for ensuring JSX is rendered correctly.
Now you can navigate to /about page by following
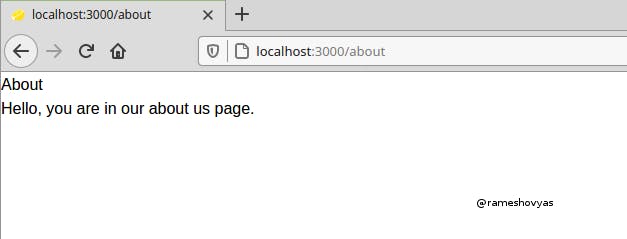
In this way you can create simple and static routes / pages for your Fresh project. Hope you enjoyed this article. You can find the source code for this artcile in my GitHub repository. Thank you for your time and support. Have a nice day ahead.