


A Step by Step Guide to access MySql database in Rust using Diesel ORM.


Rust is gaining popularity day by day and the use case of Rust is expanding as a general purpose programming language. In this step by step guide we will be creating a simple rust cli application that will display information about various plants in our garden. The database we will be using is MySql and Diesel as the ORM.
First of all we will be creating a rust cli application using the following command:
cargo new –lib diesel_demo
Now we have to move to the newly created application folder
cd diesel_demo
To use Diesel ORM we need to add diesel as one of the dependencies in our project. To add depndensies we need to modify cargo.toml file generated by cargo during creation of new project. Add the following lines of code to add diesel dependency to our project.
[dependencies]
diesel = { version = "1.4.4", features = ["mysql"] }
dotenv = "0.15.0"
The second dependency we have added is dotenv which will allow our project to use a special tool .env to help us in managing environment variables like database path etc.
Another tool we will need is the diesel_cli . This is a separate standalone application that allows us to manage various database operations without getting involved in our project. To install diesel_cli execute following command :
cargo install diesel_cli
The above command may fail in your case and this could be due to missing dependent libraries, by default disesel depends on libpq, libmysqlclient, libsqlite3 for PostgreSQL, MySql and Sqlite database respectively.
To install libmysqlclient (as we are going to use MySql database) execute the following command in your terminal :
sudo apt-get install libmysqlclient-dev
After installing the missing libraries please re execute the diesel_cli installation command and this time we will be prompted with the following message
Installed package diesel_cli v1.4.1 (executable diesel)
All well, installation of diesel_cli tool is successful, now we have to configure our environment variables. This step guides Diesel from where to find our database. This is done by setting up DATABASE_URL environment variable .
Now the point comes why we need a separate .env file why not to use system environment variables, this is because in our system we might be having other applications already running and by updating the system environment variables might effect these applications.
We will be using a separate .env file for our project’s configuration variables. Execute the following command in the project directory to create DATABASE_URL environment variable for Mysql / MariaDB.
echo DATABASE_URL=mysql://user:password@127.0.0.1:3306/diesel.. > .env
The connection string follows the following pattern for MySQL / MariaDB
In our case we have “username” as user with password as “password”, the database is locally installed with in the same machine and we have named our database as diesel_demo.
Very Important : If you are running lampp or mysql server on localhost please do not use “localhost” instead use “127.0.0.1” loopback ip address otherwise diesel cli will not be able to connect to your local database.
You will see a .env file is created having DATABASE_URL configuration variable with desired value. Now we need to use diesel cli commands to setup database for us. Execute the following command for setting up database for us.
diesel setup
The above command have created a database “diesel_demo” if it was not already existing and an empty directory “migrations” on the root directory that we will be using for our database schemas.
After setting up our database we will move to manage information for various plants in our garden, for this we need to create a table to store information about various plants. To do this we will have to create a migration for this.
diesel migration generate create_plants
The diesel cli will create two files for us.These two files allows us to apply (up.sql) or revert(down.sql) the migration when needed.
Next step is to write SQL schema for managing information about plants. Add following code to up.sql file
CREATE TABLE plant (
    PlantID int NOT NULL,
    BotanicalName varchar(100),
    CommonName varchar(100),
    Family varchar(100),
    PlantType varchar(50),
    SoilType varchar(25),
    SoilpH varchar(25),
    SunExposure varchar(25),
    CONSTRAINT PK_Plant PRIMARY KEY (PlantID)
);
Add the following code to down.sql file :
DROP TABLE plant
The next step is to apply the migrations and create table to our mysql database.To apply migrations run the following command :
diesel migration run
You have noticed that we have used raw SQL in the migration files for now but in production we will not be using raw SQL in the migration files instead we will be using the Rust embedded code to generate everything.
Now its time to write some Rust code to get the database accessed. We will be writing code to display information of all available plants in our garden.
First of all we need to establish connection to the database with in our Rust code. To do this let us edit the src/lib.rc file and add following code to it.
#[macro_use]
extern crate diesel;
extern crate dotenv;

pub mod schema;
pub mod models;

use diesel::prelude::*;
use diesel::mysql::MysqlConnection;
use dotenv::dotenv;
use std::env;

pub fn establish_connection() -> MysqlConnection {
    dotenv().ok();

    let database_url = env::var("DATABASE_URL")
        .expect("DATABASE_URL must be set");
      MysqlConnection::establish(&database_url)
        .expect(&format!("Error connecting to {}", database_url))
}
Now the connection with MySql database has been established with our Rust application we will have to create a model that will represent the data available in the database in our application, to do this we have to create a structure for the table data.
Create src/models.rs file and place the code below in that file :
#[derive(Queryable)]
pub struct Plant {
    pub plant_id: i32,
    pub botanical_name: Option<String>,
    pub common_name: Option<String>,
    pub family: Option<String>,
    pub plant_type: Option<String>,
    pub soil_type: Option<String>,
    pub soil_ph: Option<String>,
    pub sun_exposure: Option<String>
}
Make sure the order of the fields in the struct must match the order in the database table, you can refer the src/schema.rc file for the field orders. This file is generated by diesel cli when we setup database.
Before executing your program do not forget to add the following lines in your cargo.toml file
[[bin]]
name = "list_plants"
path = "src/bin/list_plants.rc"
If you have any nullable field in your table you need to use Option instead of String in your model definition.
Now final step is to access the data and for that we have created a rust program, file in src/bin/list_plants.rs
extern crate diesel_demo;
extern crate diesel;

use self::diesel_demo::*;
use self::models::*;
use self::diesel::prelude::*;

fn main() {
    use self::schema::plant::dsl::*;

    let connection = establish_connection();
    let results = plant
        .limit(5)
        .load::<Plant>(&connection)
        .expect("Error loading posts");
    println!("-----------------------------------------");
    println!("Found {} plants in my garden", results.len());
    println!("----------------------------------------\n");
    for p in results {
        println!("Common Name : {:?}", p.common_name);
        println!("Botinical Name : {:?}", p.botanical_name);
        println!("Family : {:?}", p.family);
        println!("Plant Type : {:?}", p.plant_type);
        println!("----------------------------------------\n");

    }
}
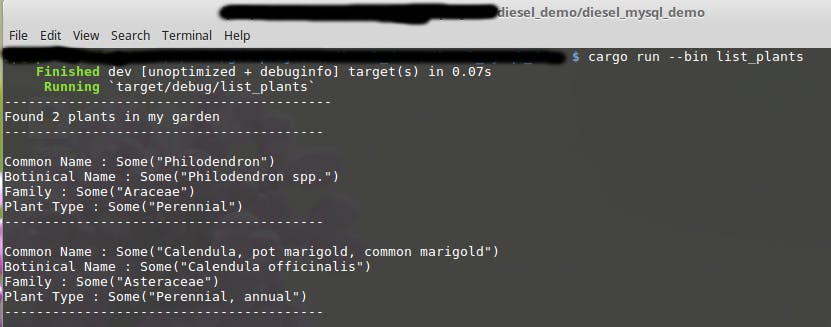
To execute the code and display all available plants in our garden use the following command :
cargo run --bin list_plants
The source code of this project is available on my github repository